
A practical, no-nonsense guide for men who want to try it without making it a whole thing.
There are probably two kinds of people reading this article.
The first group already paints their nails and is looking for ways to improve at it, make it easier, or maybe finally understand what the hell leveling up to gel coat entails.
The second group is a much harder audience to write for.
That’s the group that has thought about doing this for a while now, but they haven’t taken the leap yet. Maybe they saw another guy doing it and thought it looked cool. Maybe, as was the case with me, a partner suggested they should try it. Maybe they’ve spent time eyeballing nail polish displays at Target, trying to figure out where to get started.
That’s who this article is for.
So If You’re Hesitating… You’re probably not actually hesitating.
You’re stalling.
Because, despite what your brain is probably telling you, painting your nails is not that complicated, not that serious, and honestly? Almost certainly not nearly as big a deal as you might be making it out to be.
We already talked about the identity side of this in my earlier piece, On Men, Color, and Painted Nails. This is the practical follow-up. The real-world version. The “okay, but how does this actually work?” article.
And the first thing worth understanding is that there are levels to doing this.
Not emotionally. Financially. Technically. Spiritually, maybe.
The First Time Feels Weirder Than It Actually Is
The first few times I painted my nails, I was hyper-aware of them.
Every time I handed someone a credit card. Every time I took a sip of a drink in public. Every time I was on a Zoom call and reached for a coffee mug, I was aware that my hands were visible.
That self-consciousness fades over time.
But the interesting thing about that awkward phase is that the weirdness almost entirely came from me. It was all self-generated. In real life, nobody cared. If anything, people were overwhelmingly positive about it. Compliments, curiosity, questions. That was the reality. Nobody was judging me for having my nails painted, at least not in any perceivably negative way.
The turning point happened at a recent family holiday party.
For a few years in a row, I had done holiday-themed nails. Last year, because of my NYC commute and work schedule, I didn’t have time to do them before the party… and multiple cousins were genuinely disappointed. One flatly exclaimed, “What the hell?! I was looking forward to seeing what you did this year.”
Not only had painting my nails stopped being “a big deal,” it had become expected. Normal. Part of me, and who I am.
That was an interesting moment for me.
Not only had painting my nails stopped being “a big deal,” it had become expected. Normal. Part of me, and who I am.
Ironically, I didn’t fully realize how much it had become part of my identity until I stopped doing it for a while during job interviews and career transitions. I told myself it was practical. That I was being professional. That it was easier to forgo rather than explain it.
And you know what? I hated it.
It genuinely felt like part of me was missing.
That’s when I realized this wasn’t some novelty experiment anymore. Painted nails had become part of how I express myself. It was part of my identity.
But once you do decide you’re going to give it a shot, the next thing you need to understand is that there are two ways to approach this.
Toe Dipping: Standard Nail Polish
This is where almost everyone should start.
Standard polish has a low barrier to entry. You can build a perfectly functional starter kit for under fifty bucks and figure out whether this is something you even enjoy before investing in more expensive polishes and equipment.
You do not need:
- a professional manicure setup
- twelve specialty products
- expert-level precision
- influencer-level skill
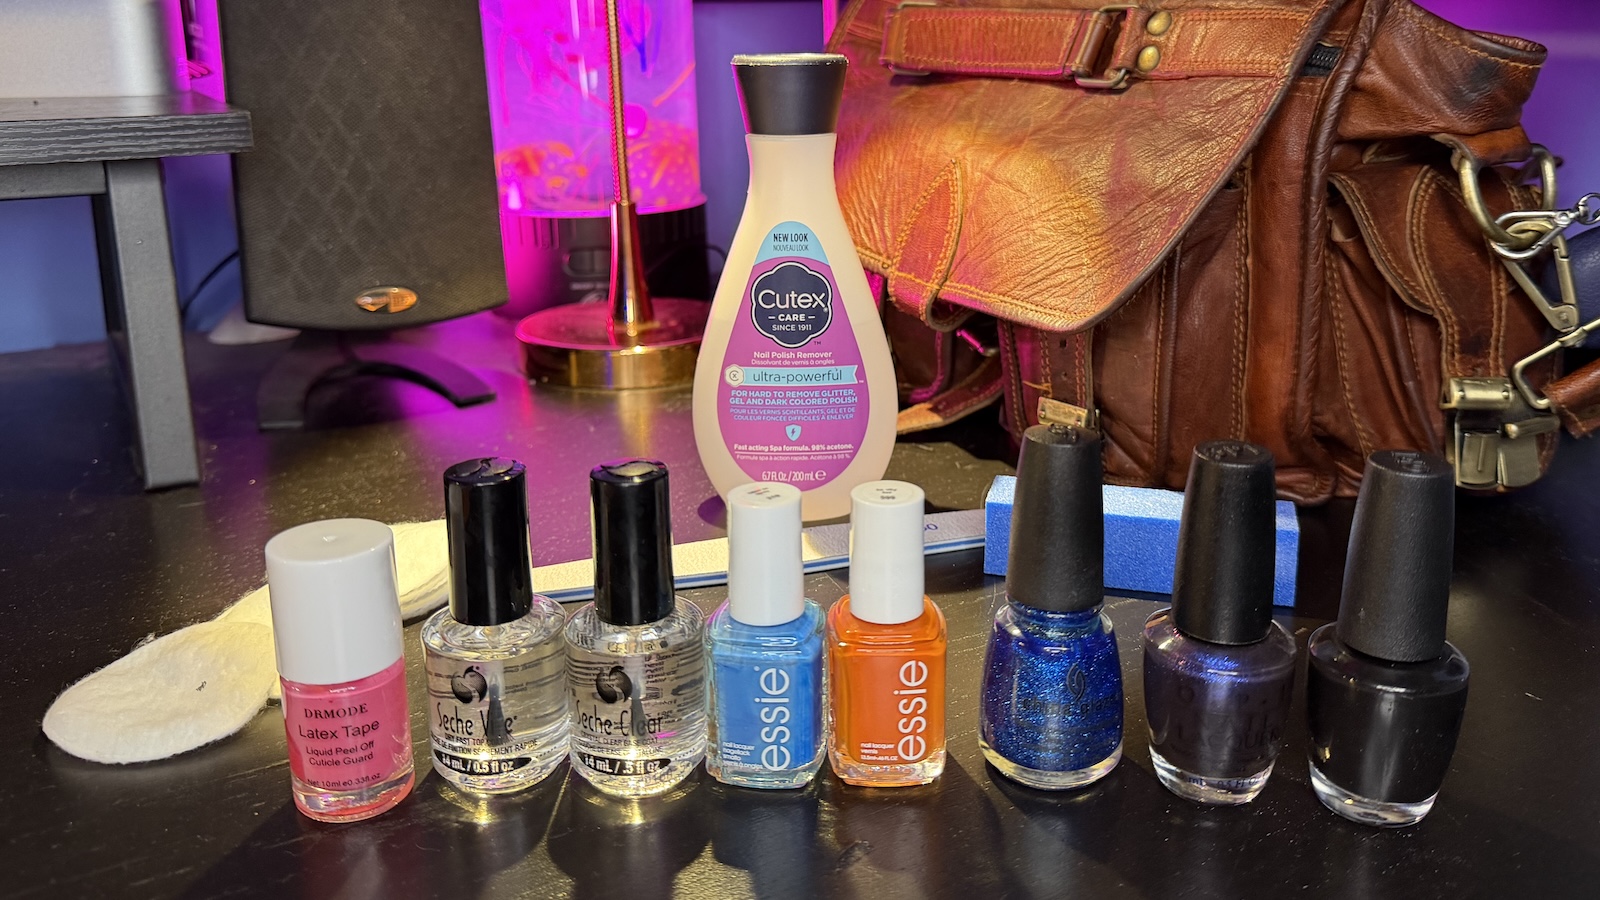
You need:
- a base coat
- a top coat
- a few colors you like
- acetone
- cotton pads and Q-Tips
- a few emery board files and sponge nail buffers
- and a metric fuckton of patience
That’s it.
I started with Essie colors and Seche Vite fast-drying base and top coats. I also used liquid latex around the nail beds early on because my brush control was terrible. Think of it like using painters’ tape while edging around trim work. It helped keep things neat and tidy while I learned.
And let me make something very clear right now:
Base coats and top coats are not optional.
If you take nothing else from this article, take that.
The Tradeoff With Standard Polish
Standard polish is affordable and easy to remove.
It is also unbelievably annoying sometimes.
You will think your nails are dry. They are not dry.
You will go about your day feeling confident that your nails are good to go, touch literally anything during an entirely mundane task, and discover an entire nail has slid off your finger like tectonic drift.
This will happen.
You need to treat the first hour after painting your nails with standard polish as if you have lost the ability to use your hands.
You need to treat the first hour after painting your nails with standard polish as if you have lost the ability to use your hands.
That’s part of the deal.
Chipping is also part of the deal. Personally, I don’t care much about chips unless they happen immediately. If I know I’m spending Saturday landscaping or working in the garden, I’m not painting my nails Friday night. That’s just setting myself up for heartbreak. But after a few days of perfect polish, chips add character. I don’t mind the grunge aesthetic.
But honestly? None of that stopped standard polish from being fun.
Because that’s the important thing to keep in mind… this is fun.
It’s putting yourself out there. It’s color. It’s aesthetics.
Sometimes it’s tied to identity, creativity, or self-expression.
Sometimes it’s just because black glitter nails look cool as hell with a watch and a leather jacket. Not everything needs a deeper justification.
The Practical Takeaways for Standard Polish
If you’re just trying this for the first time, standard polish is still the best entry point. It’s inexpensive, forgiving, and easy to remove if you decide it’s not for you.
You do not need to commit to becoming an expert on day one.
Keep in mind, thin coats. Thin base coat, let it set. Think color coats with ten minutes in between. Then finish it off with a thin topcoat. Thick coats cause all kinds of problems curing, and cause that catastrophic failure of a whole nail sliding off.
With standard polish, my process was always to completely finish my left hand first, then start working on my right hand (I’m a righty.)
Going All In: Gel Polish
Eventually, standard polish started frustrating me enough that I upgraded.
Not because I suddenly became deeply invested in the latest state-of-the-art nail technology, but because I was painting my nails often enough that the limitations of standard nail polish were no longer justifiable.
Gel polish changes the entire experience.
The biggest difference is simple:
Once gel is cured, it’s done… and that alone is game-changing.
No more sitting around for hours trying not to ruin your work. No more discovering mysterious imperfections later that night. Once you finish curing a gel manicure under the lamp, you can immediately go about your day like a functional human being again.
That convenience is what converts people.
The durability is also dramatically better. Standard polish might last a week on your nails if you’re lucky. Gel can last multiple weeks without issue. I once had a professional gel pedicure that lasted almost four months before it finally grew out enough to remove. Gels last.
That said, gel absolutely requires more setup and investment.
Going All In: Gel Polish
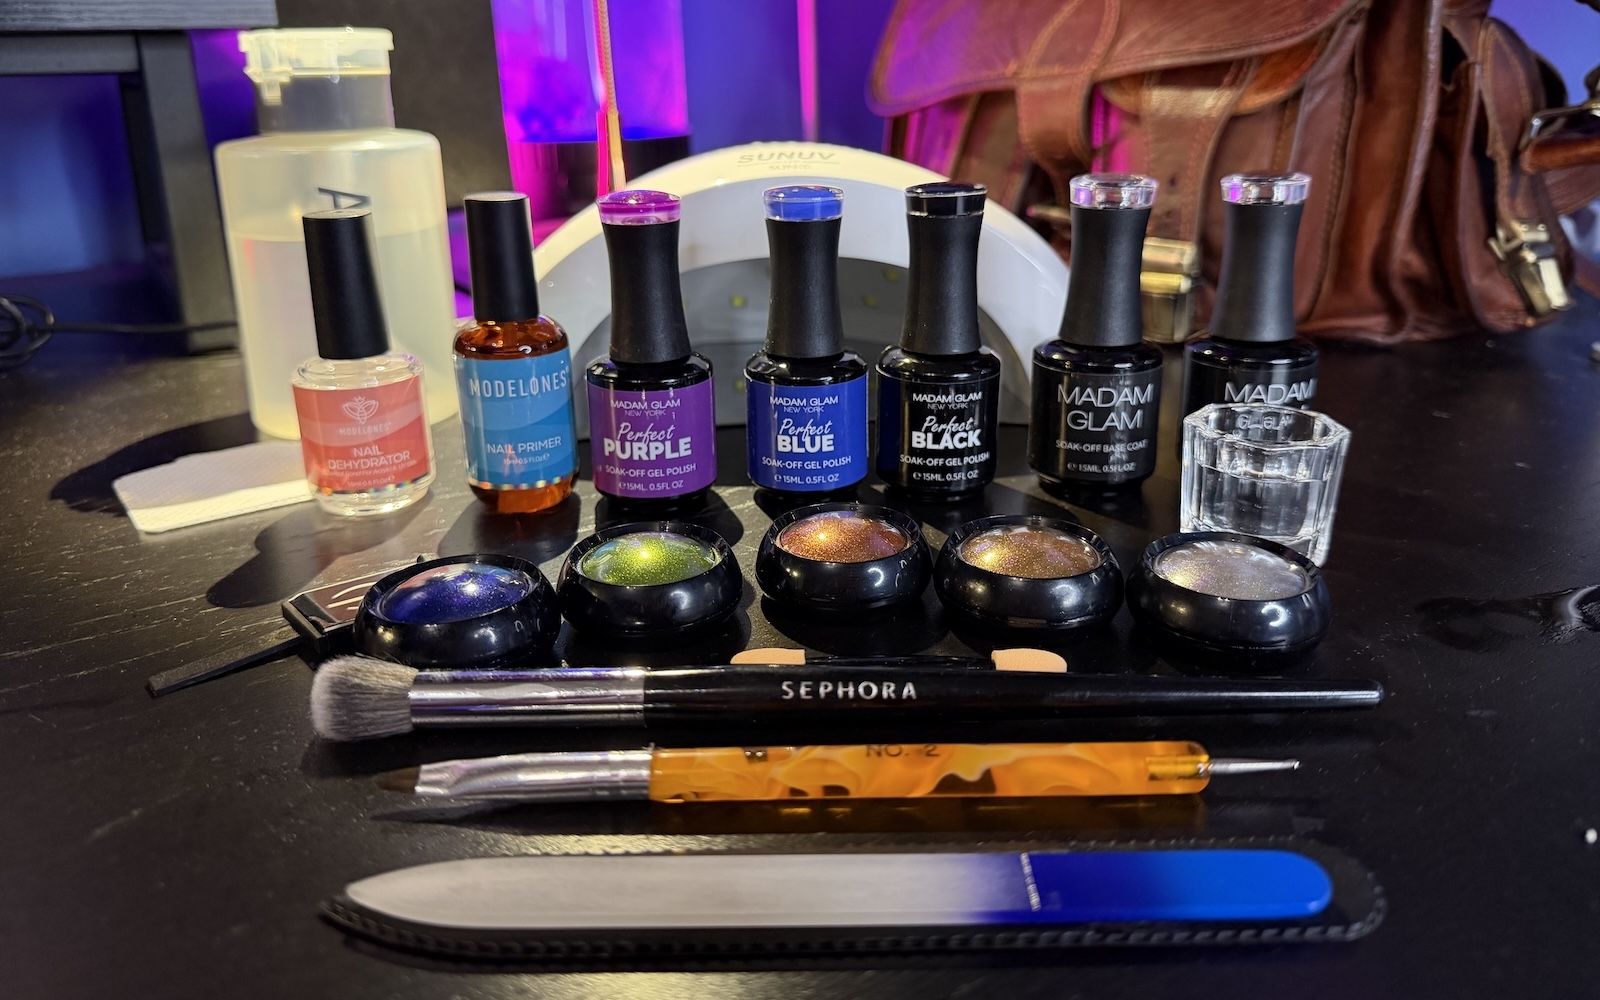
You’ll need:
- a UV or LED lamp
- nail dehydrator
- nail primer
- lint-free wipes
- alcohol and alcohol pump dispenser
- soaking bowl
- removal tools
My setup uses:
- Madam Glam Base Coat
- Madam Glam Top Coats (gloss and matte)
- Madam Glam Color (Classic, Glitter, Cat-Eye, Shimmer, Neon)
- ModelOnes prep products for the dehydrator and primer
- a SUNUV SunOne Lamp
And yes, once you fall down this rabbit hole, things escalate quickly.
One minute, you’re buying a few colors. The next minute, you’re experimenting with chrome powders or magnetic cat-eye effects like a mad scientist,
One minute, you’re buying a few colors.
The next minute, you’re experimenting with chrome powders or magnetic cat-eye effects like a mad scientist, wielding strange alchemy on your living room coffee table.
That’s just how this goes.
The Downside of Gel
Removing gel polish is annoying. There’s no way around it.
You have to use a file to score the surface of the topcoat. Then you need to soak the nails in heated acetone inside a nail soaker for ten to fifteen minutes. Then scrape the softened layers away with a tool. The first time rarely gets it done. You have to repeat the process patiently, all while avoiding destroying your nails.
This is the tax you pay for speed and durability.
There are also valid conversations around ingredient safety and lower-quality products. Personally, I stick with reputable brands, like Madam Glam, and avoid random Amazon sellers because I’d rather not gamble with chemical products sitting directly on my skin. Please understand this isn’t any kind of endorsement for Madam Glam. We don’t do that at Tattooed & Tweed. Rather, they’re a US-based company, reputable, and they’re based in New Jersey, as we are. So when I place an order, I have it in two to three days.
The Practical Takeaways for Gel
If painting your nails starts becoming part of your regular life instead of an occasional feeling frisky experiment, gel quickly becomes worth the investment.
The time savings alone completely change the experience.
Like standard polish, thin layers are the way to go. Unlike standard polish, you don’t need to complete one hand first and then move on to the other. You can work on both hands in the order of the steps: dehydrator, primer, base, color, and topcoat.
But here’s my insider tip. One thing I learned quickly: gel polish is self-leveling. Because your thumb sits vertically in the lamp, the product naturally shifts downward while curing. I always cure my thumbs separately from the rest of my fingers.
Which One Should You Choose?
Honestly? Most people should start with standard polish.
Why? Because that’s how you learn.
It teaches patience. Brush control. Thin coats. Cleanup. It teaches you how nail polish behaves. It teaches you how to get that perfect bead on the end of the brush and push it right up to the cuticle without ever touching skin.
And more importantly, it lets you figure out whether this is something you genuinely enjoy before committing to additional gear, expense, and complication.
But if you already know yourself well enough to understand this is going to stick? Going straight to gel is completely reasonable, too.
There is no National Men Painting Nails Ethics Council enforcing the rules here. You do you, boo.
What Actually Matters
Your technique doesn’t matter as much as your persistence does.
You are probably going to suck at this at first. I say this because I absolutely sucked at this at first.
Everyone does.
You’ll flood cuticles. You’ll use coats that are too thick. You’ll smudge things. Ruin finishes. You’ll accidentally create textures previously unknown to science.
At one point, I was convinced I could resurrect a botched nail job and achieve the perfect finish by using the same wet sanding techniques you would use to paint a 1970 Mustang Mach 1, because that’s how men problem solve.
That’s normal, in the sense that trying, experimenting, and failing is how you learn.
The biggest mistake beginners make is trying to be perfect immediately.
But takes this as gospel:
Thin coats will always work better than thick ones.
Patience works better than rushing.
Practice works better than confidence.
And honestly? Most people are far too worried about what strangers think.
In my experience, the reactions in real life have been overwhelmingly positive. Coworkers were curious. Friends complimented them. People at conventions, tradeshows, flea markets, bars, and events mostly just thought they looked cool.
The only remotely weird interaction I’ve had was someone assuming my daughters painted them.
I don’t have kids.
That’s the level of “negative reaction” we’re dealing with here.
So If You’re Hesitating…
If you’re still here reading this. If you’ve made it this far… You’re probably not actually hesitating.
You’re stalling.
Because once the idea gets lodged in your brain, you already know whether you’re going to try it or not.
Eventually, painting your nails stops feeling like something you’re trying. It just starts feeling like who you are.
That’s how it worked for me.
Yes, for me, the gap between being told “you could totally pull that off” and actually buying the product and painting my nails was months long, but mentally? I had already decided. I knew I was going to do it.
So, if that sounds like where you’re at right now? Go for it.
Rip the band-aid off.
Buy a few colors, don’t forget the basecoat and topcoat.
Make a mess.
And if you completely screw it up the first time? Welcome to the club.
Try again. Figure it out. Get it right.
Once you’re happy with it, go out into the world and see how it feels. Take it for a test drive. Get comfortable with it.
Then do it all over again… with confidence.
And eventually, it stops feeling like something you’re trying.
It just starts feeling like who you are.